


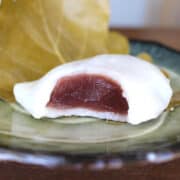
If you've ever wondered how to make Homemade Kashiwa Mochi (柏餅 or 柏もち), today is your day! Made with just 6 simple ingredients with only 20 minutes of active work, these delightful gluten-free mochi treats are sure to become a favorite.
This recipe was originally published on May 5, 2016. It was updated with new photos and information on April 24, 2023.
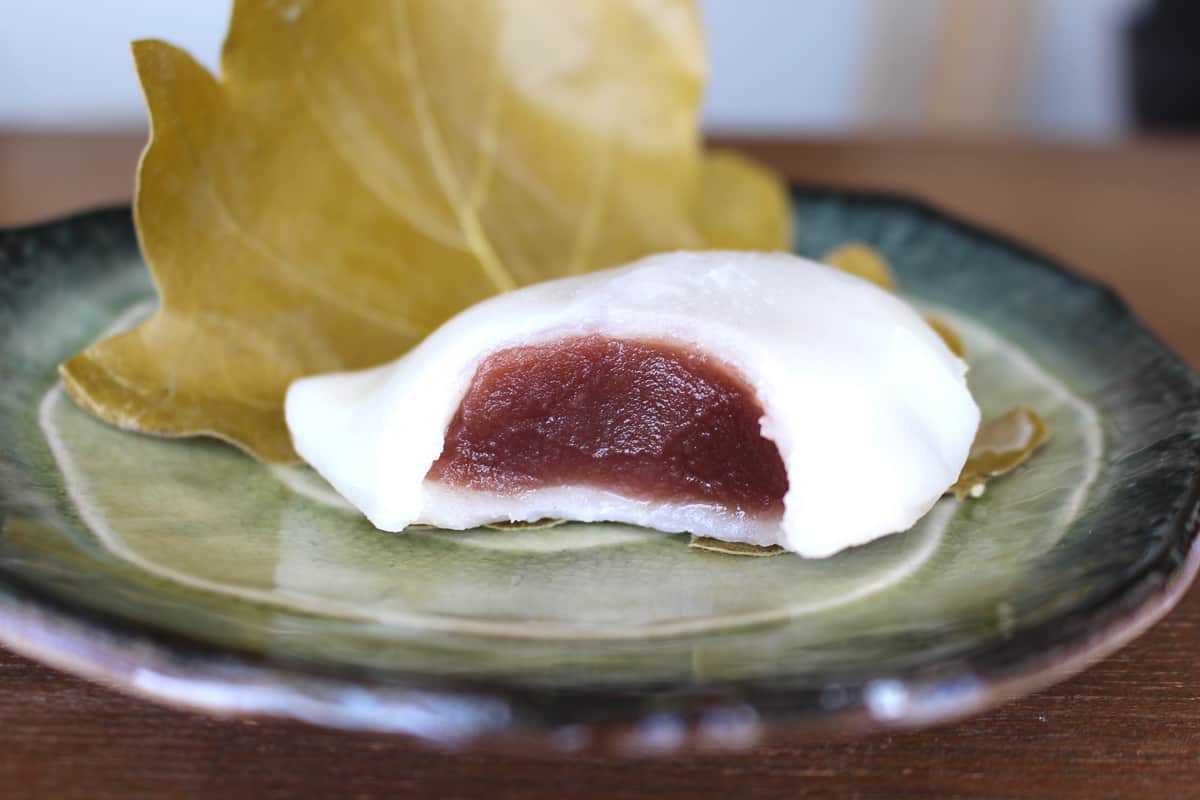
Table of contents
What Is Kashiwa Mochi?
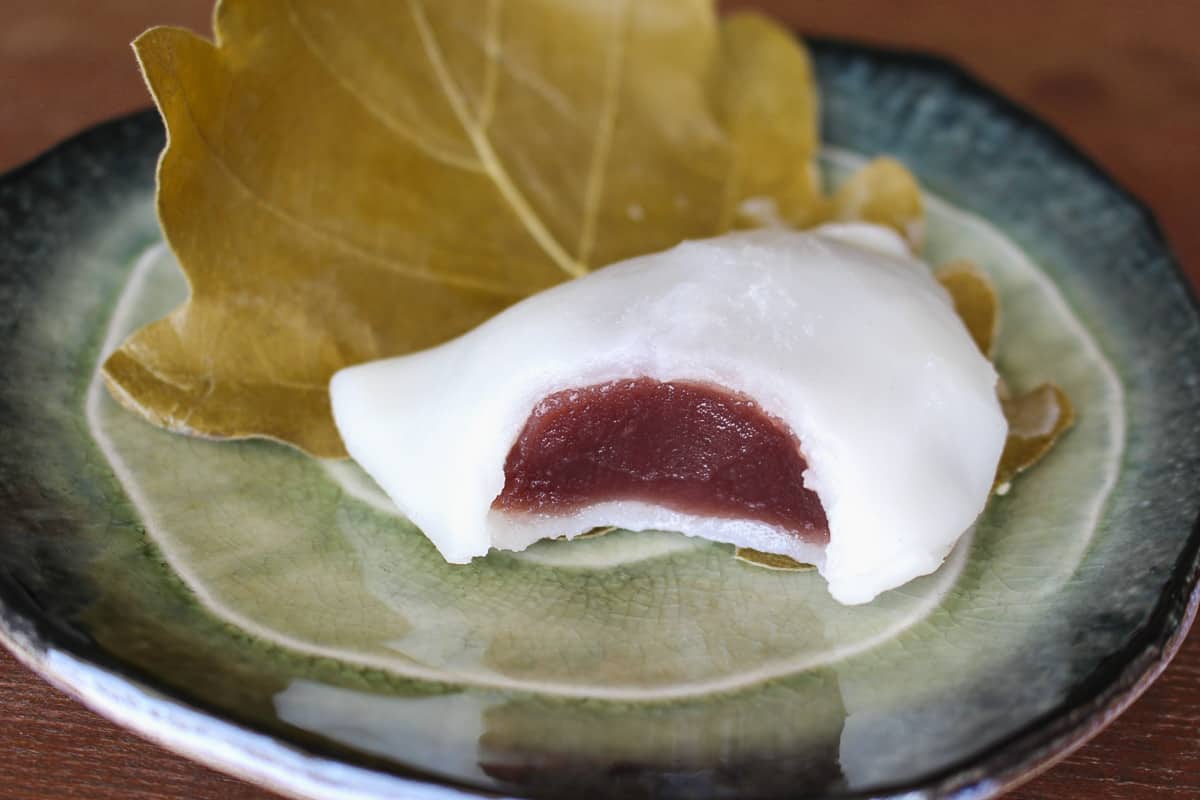
For those who are not familiar, Kashiwa mochi is a traditional Japanese sweet made with glutinous rice cake (a.k.a. mochi), sweet red bean paste (a.k.a. anko), and an oak leaf (a.k.a. kashiwa leaf).
It's a popular snack that's especially enjoyed on Kodomo no hi (子供の日), or “Children’s Day” in Japan. That said, it's also a yummy snack that you can enjoy anytime, anywhere. In fact, it's one of my favorite Japanese desserts of all time!
What is Kodomo no hi?
May 5th may be associated with Cinco de Mayo for many people in the US, but in Japan, we have a national holiday known as Kodomo no hi, or Children's Day. This Japanese holiday is meant to celebrate the healthy growth of all children.
That said, Kodomo no hi is also sometimes referred to as Tango no Sekku (端午の節句), or the “Boy’s Festival.” Don’t worry, though! Hinamatsuri (雛祭り), or “Girl's Day,” celebrates the health and happiness of girls so nobody is overlooked.
One of the ways people celebrate Kodomo no hi is by eating these kashiwa-wrapped mochi. Kashiwa leaves don't fall in the cold winter, but only when the new leaves come out, representing a flow from one generation to the next, and the prosperity of the descendants. Lovely, right?
When did eating kashiwa mochi for Children’s Day become a tradition?
The tradition of eating kashiwa mochi for Children's Day dates back to the early 1600s in the Edo period. In Japan, Children's Day was originally a celebration of boys and their growth. It was believed that eating kashiwa mochi would bring strength and health to boys.
The oak tree, which is where the kashiwa leaves come from, is a symbol of strength and longevity. It was believed that by eating the mochi wrapped in oak leaves, boys would become strong and resilient like the tree.
Over time, the tradition of eating kashiwa mochi on Children's Day spread to other parts of Japan, and it became a popular custom for families to enjoy the sweet together. While the holiday has evolved to celebrating all children, the tradition of eating this beloved treat remains an important part of the festivities.
Recipe Overview
Get ready to impress your friends and family with these uniquely delicious homemade mochi treats. You won't be sad you did!
Aside from being absolutely delicious, this Kashiwa mochi recipe is also:
- Quick & Easy. While they might look complicated, the process of making red bean mochi is fun and easy. There's even room for the kiddos to get involved!
- Allergen-Friendly. Since these adzuki beans mochi are naturally gluten-free, dairy-free, soy-free, nut-free, and corn-free, they’re safe for most folks to eat!
- Wholesome & Nutritious. While these Japanese mochi are intended as a dessert, they’re actually pretty darn virtuous. They’re primarily made with rice and beans (which together form a perfect protein) and are lightly sweetened with regular granulated sugar. All of the ingredients are easy to pronounce, with no weird artificial preservatives, colors, or ingredients to be found.
Ingredients Needed
As promised, you only need a handful of ingredients to make this easy mochi recipe. Here’s what to grab:
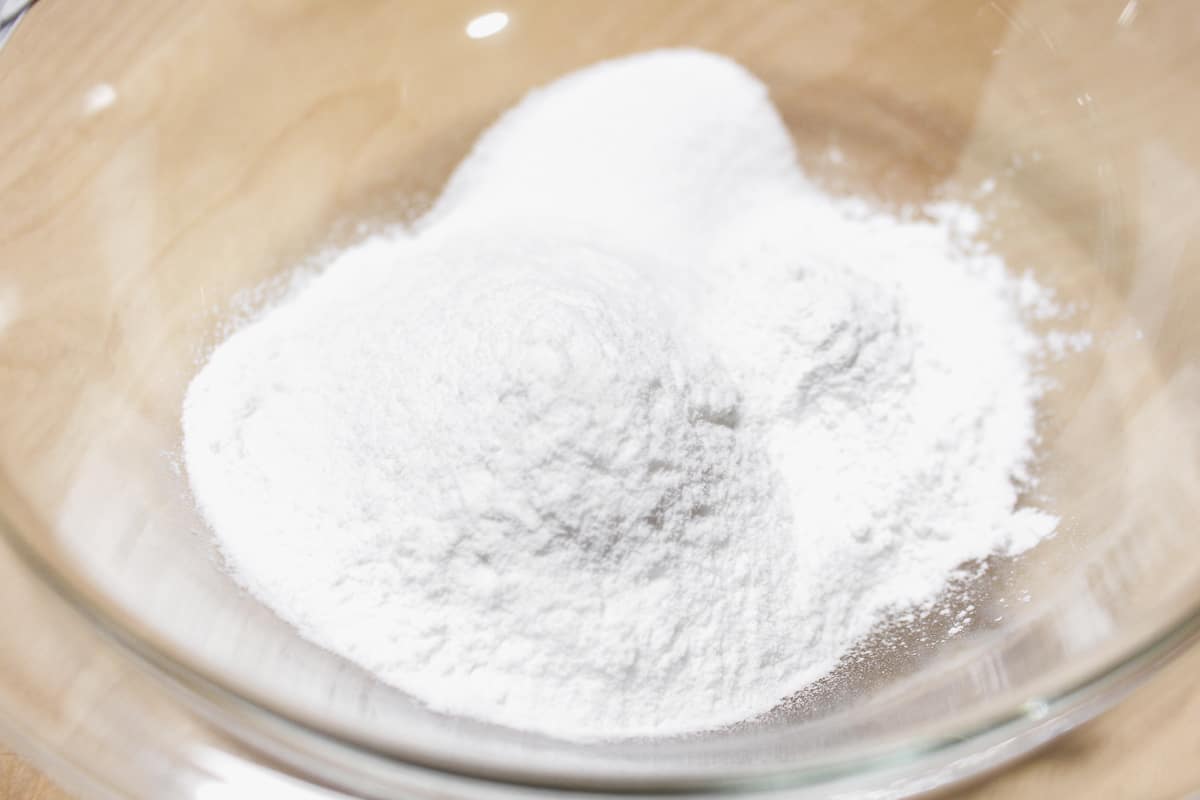
- Joshinko Rice Flour (上新粉) - This type of rice flour is made from finely milled glutinous rice that has been soaked and steamed before being dried and ground into a fine powder. If you can't find Joshinko Rice Flour, you can substitute it with regular glutinous rice flour or Mochiko Sweet Rice Flour.
- Mochi Flour (もち粉) - This type of flour is also made from glutinous rice, but it's been treated differently than Joshinko Rice Flour. Mochi Flour is made by soaking glutinous rice overnight, steaming it, and then pounding it into a smooth paste before drying and grinding it into a powder. Mochi Flour is essential for making mochi, and there are no substitutes.
- Granulated Sugar - To sweeten the dough and balance out the earthy flavor of the oak leaf. If you're looking to reduce your sugar intake, you can substitute it with other natural sweeteners like honey, maple syrup, or agave nectar.
- Water - To help bind the dough together and make it pliable enough to shape. Try to use filtered water for the best possible flavor. You can also substitute water with other liquids like milk or coconut water if you want to add a little extra flavor.
- Anko (Red Bean Paste) - This sweet paste is made from azuki beans that have been boiled, mashed, and sweetened with sugar. It's a popular Japanese mochi filling, adding a delicious and earthy sweetness to our kashiwa mochi. I used store-bought for convenience, but you’re welcome to make your own. If you don't have anko, you can substitute it with other sweet fillings like peanut butter, Nutella, or even fresh fruit.
- Potato Starch - To dust the dough and prevent it from sticking to your hands and work surface. You can swap in cornstarch or tapioca starch if needed.
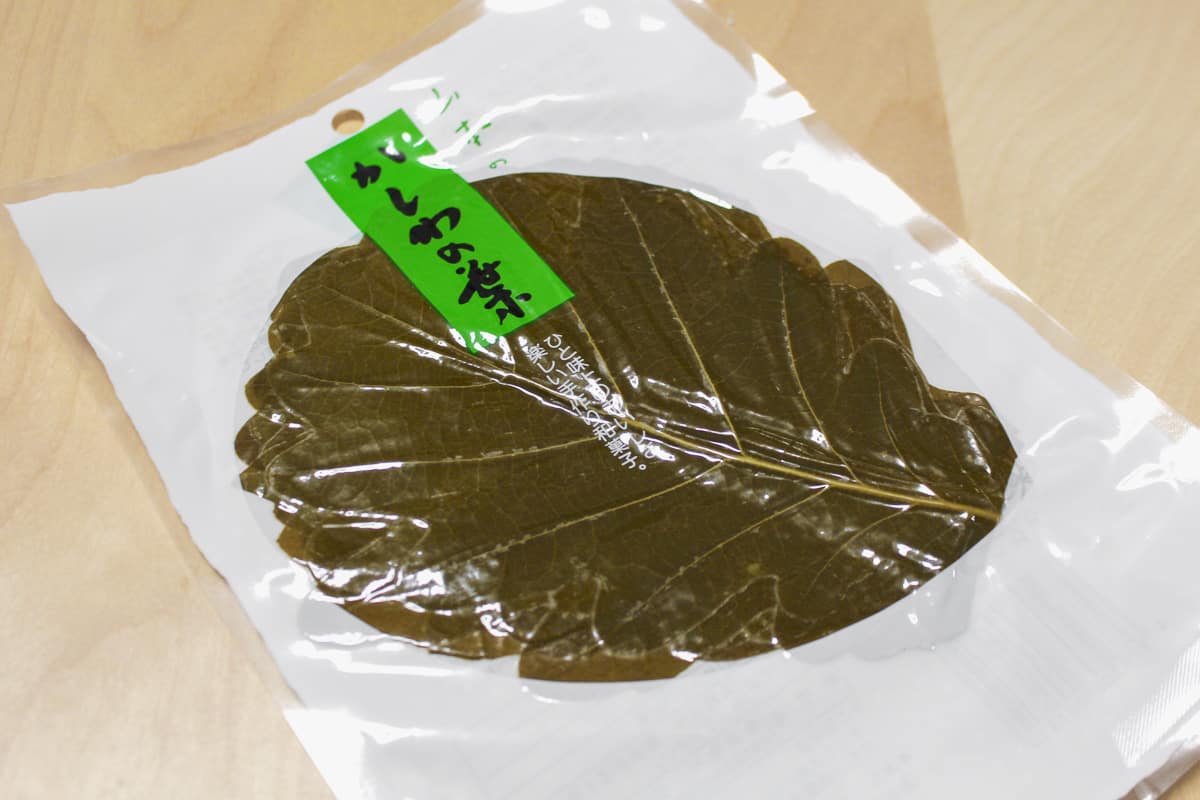
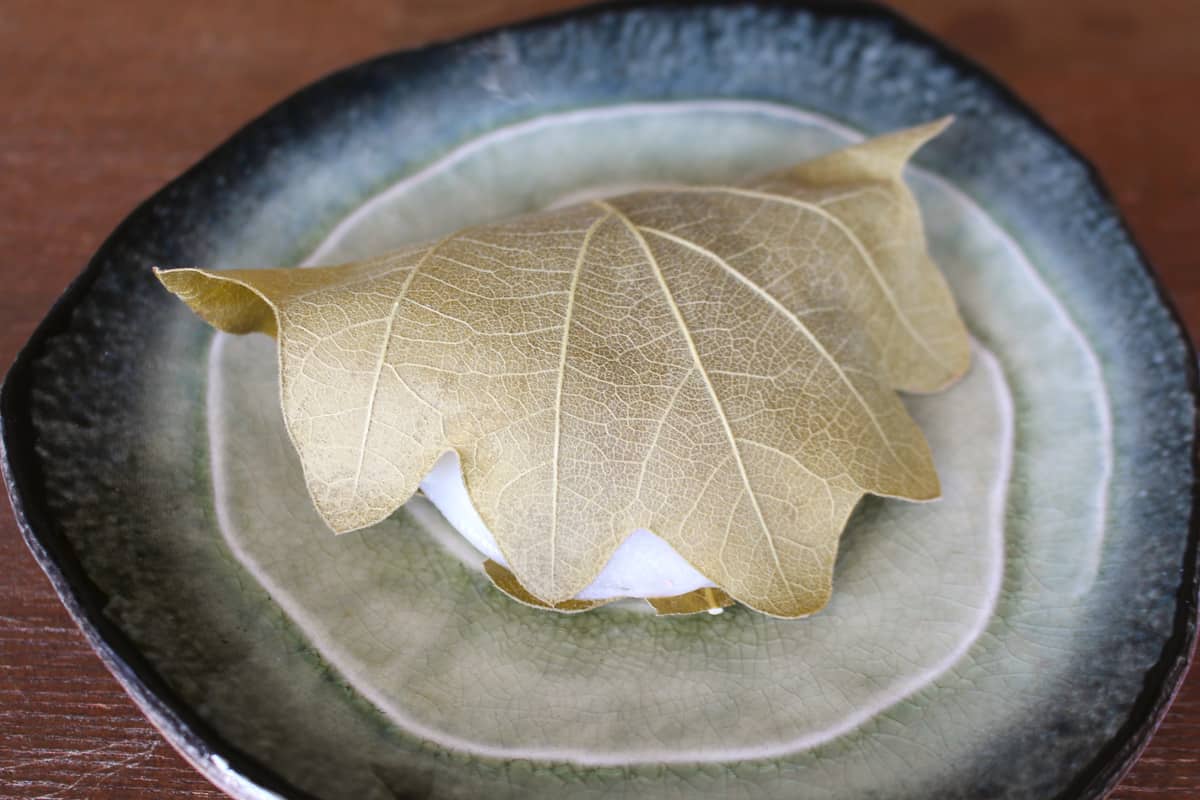
- Kashiwa Leaves - These traditional oak tree leaves are used to wrap our kashiwa mochi to represent the prosperity of a new generation. They add a subtle, earthy flavor to the mochi and help to keep it fresh. If you can't find kashiwa leaves, you can substitute them with bamboo leaves, banana leaves, or even parchment paper.
How To Make Mochi
This red bean mochi recipe comes together with almost no fuss. Here’s how:
Step 1: Prep Kashiwa Leaves. The kashiwa leaves are sold either dried or vacuum-packed. The dried leaves have to be rehydrated by boiling them in hot water, but vacuum-packed leaves just need to be rinsed with water and pat dry with a paper towel. Use whichever method makes sense and set them aside to use later.
Step 2: Dry Ingredients. In a bowl, mix the joshinko rice flour, mochi flour, and granulated sugar.
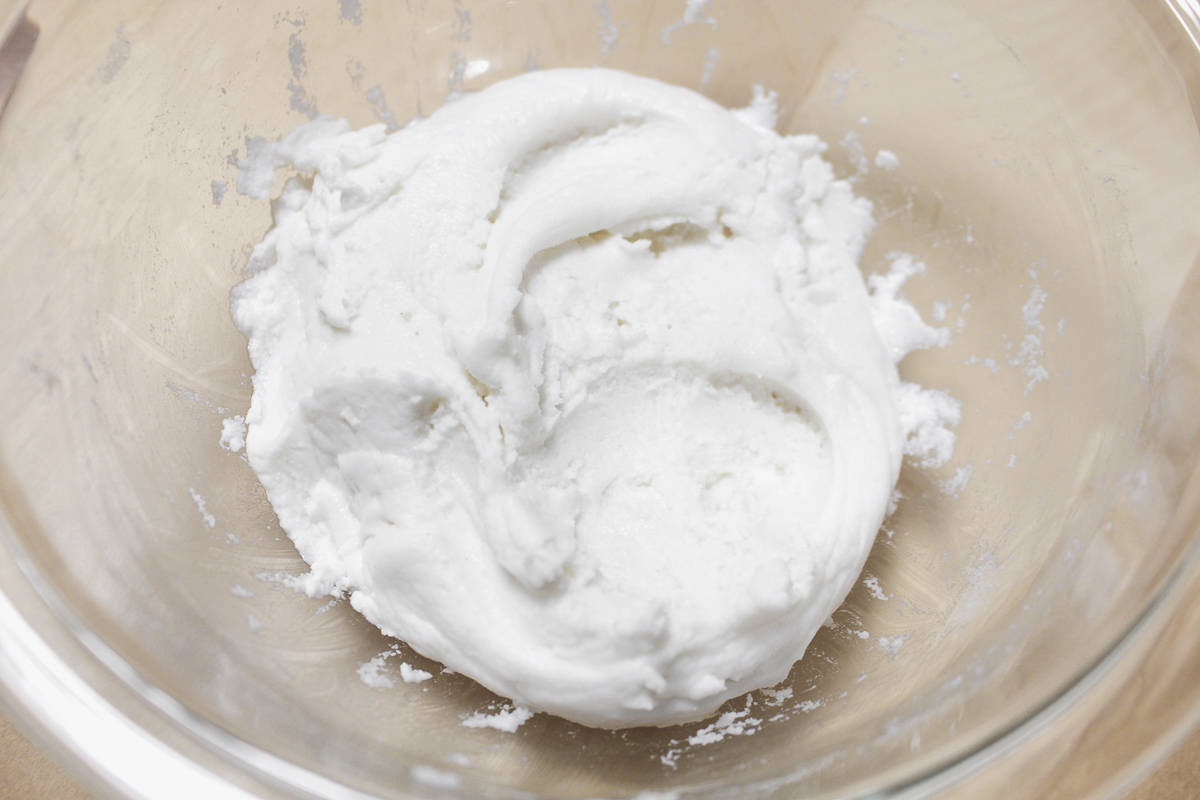
Step 3: Make Mochi Paste by slowly adding the water to the dry ingredients and stirring until it forms a thick paste.
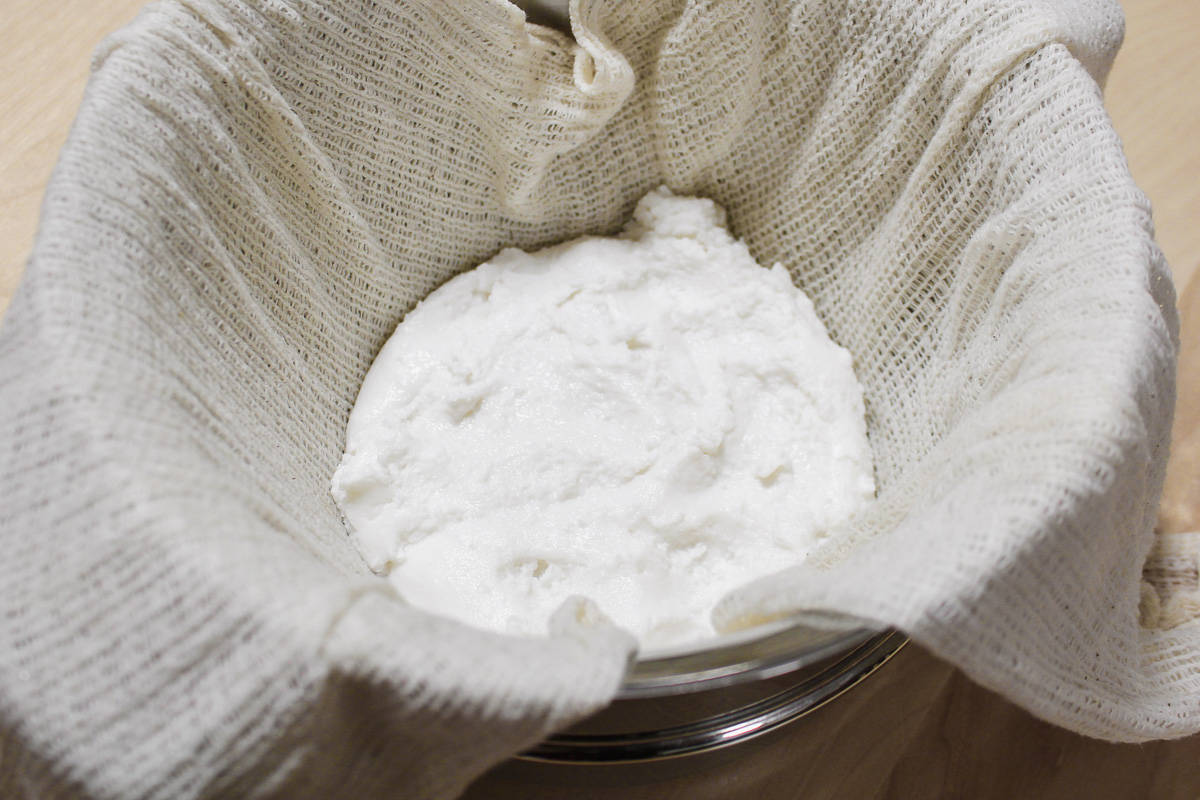
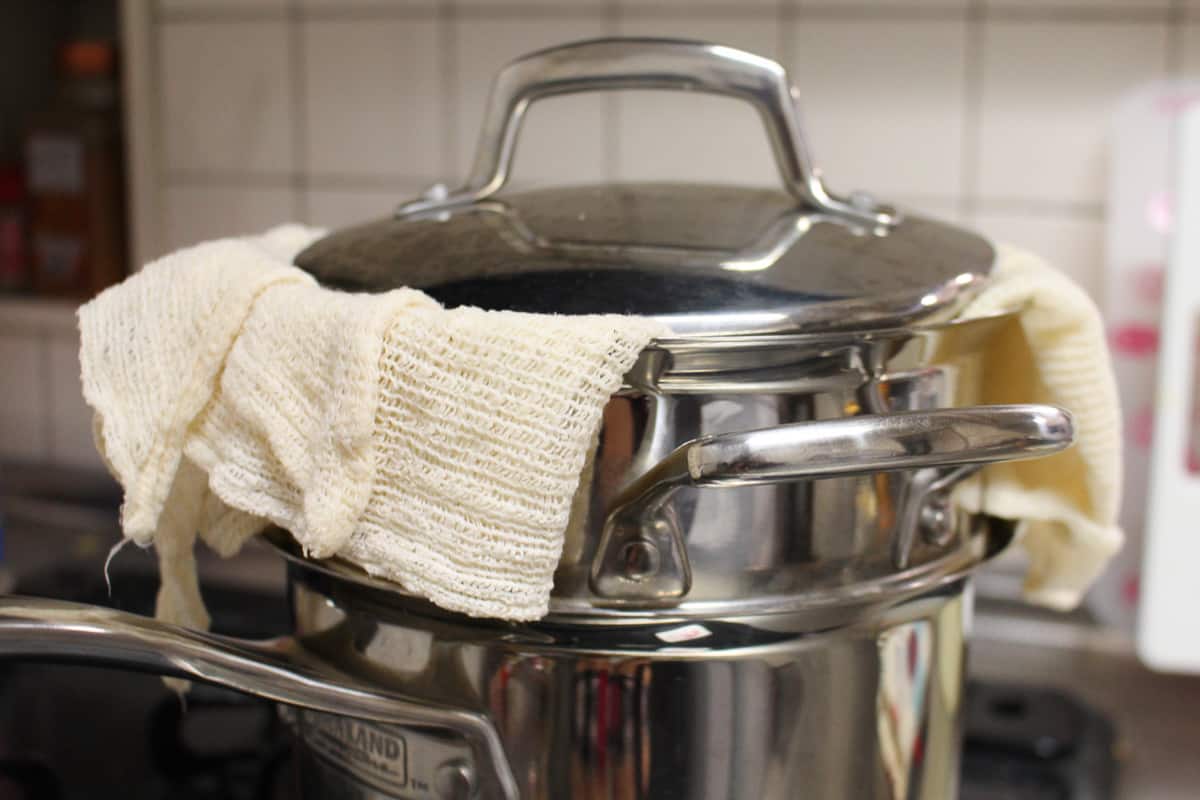
Step 4: Steam Mochi. Line your steamer with cheesecloth or parchment paper and put the paste inside. Cover and steam for 20 minutes. Leave the parchment paper lining in place for future use.
Step 5: Divide Anko. Meanwhile, divide your sweet red bean paste into 8 and roll them into balls.
Step 6: Knead. When the mochi is finished steaming, take it out and knead it until it comes together in a ball. You can wear rubber gloves, use a damp tea towel, or keep dipping your hands in ice water to avoid burning yourself. Divide the mochi into 8 equal pieces.
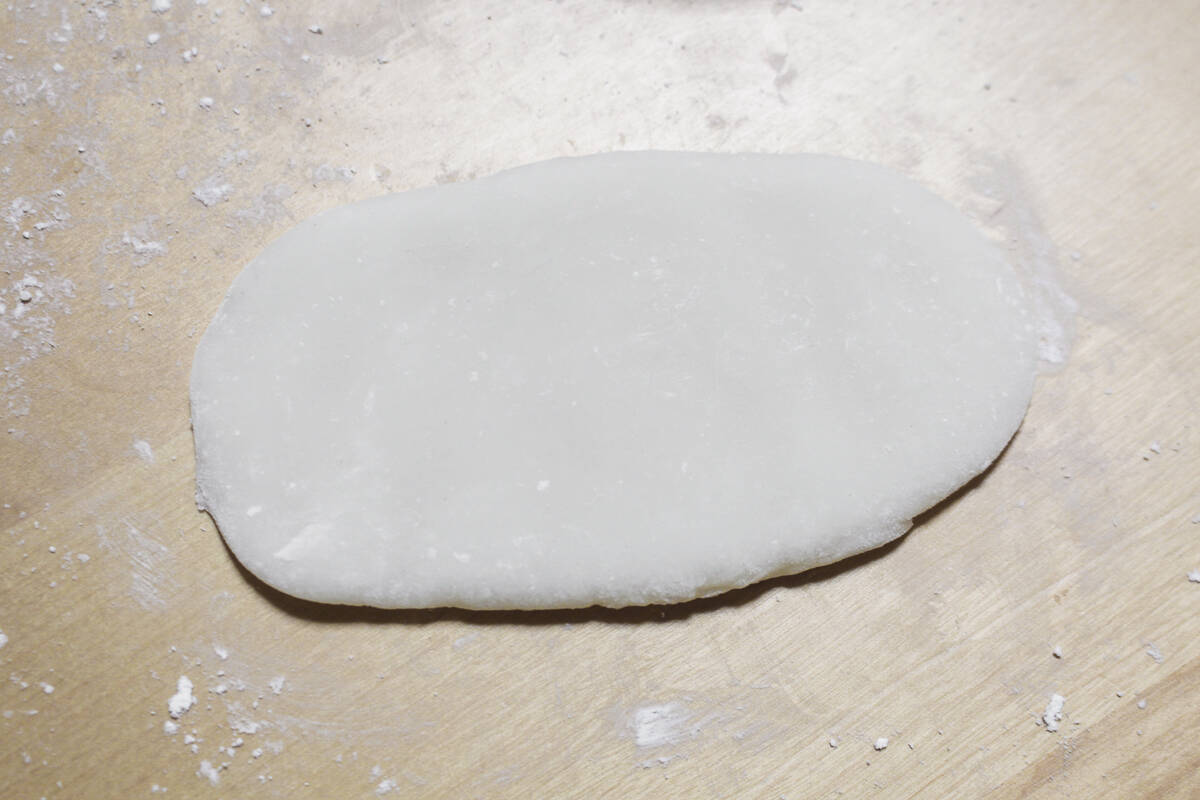
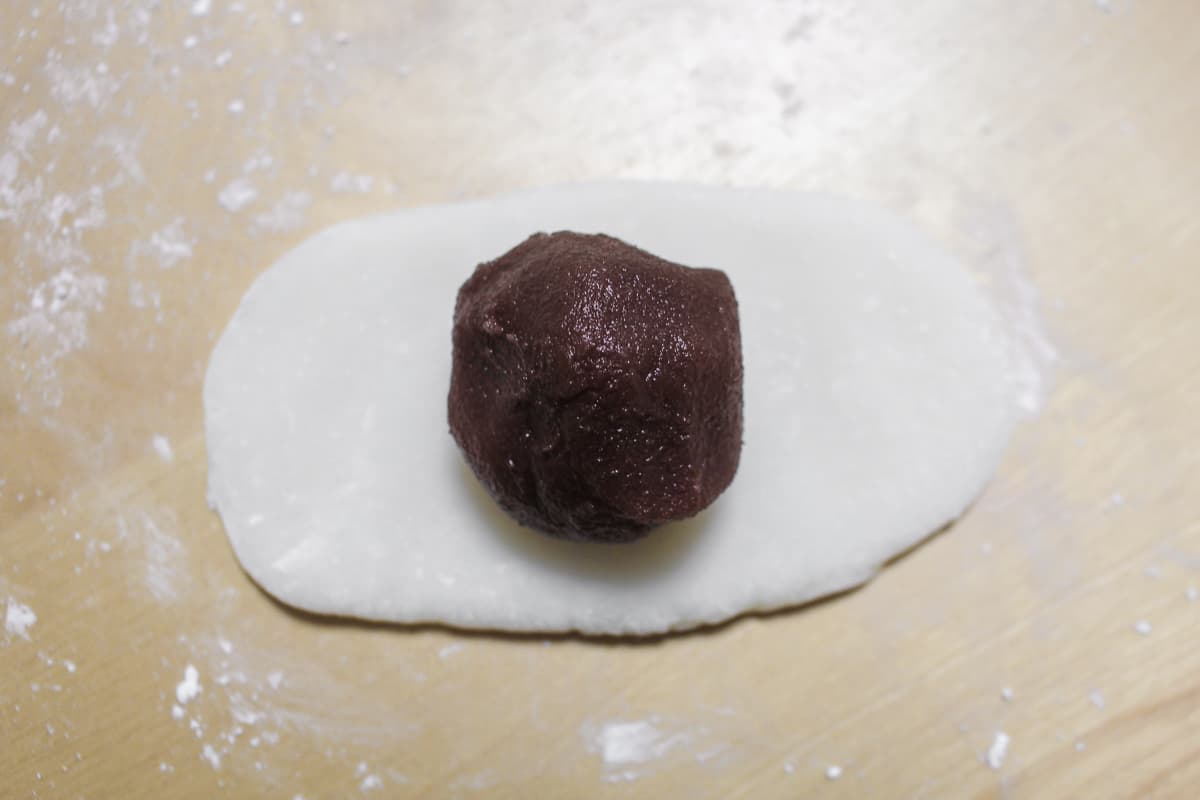
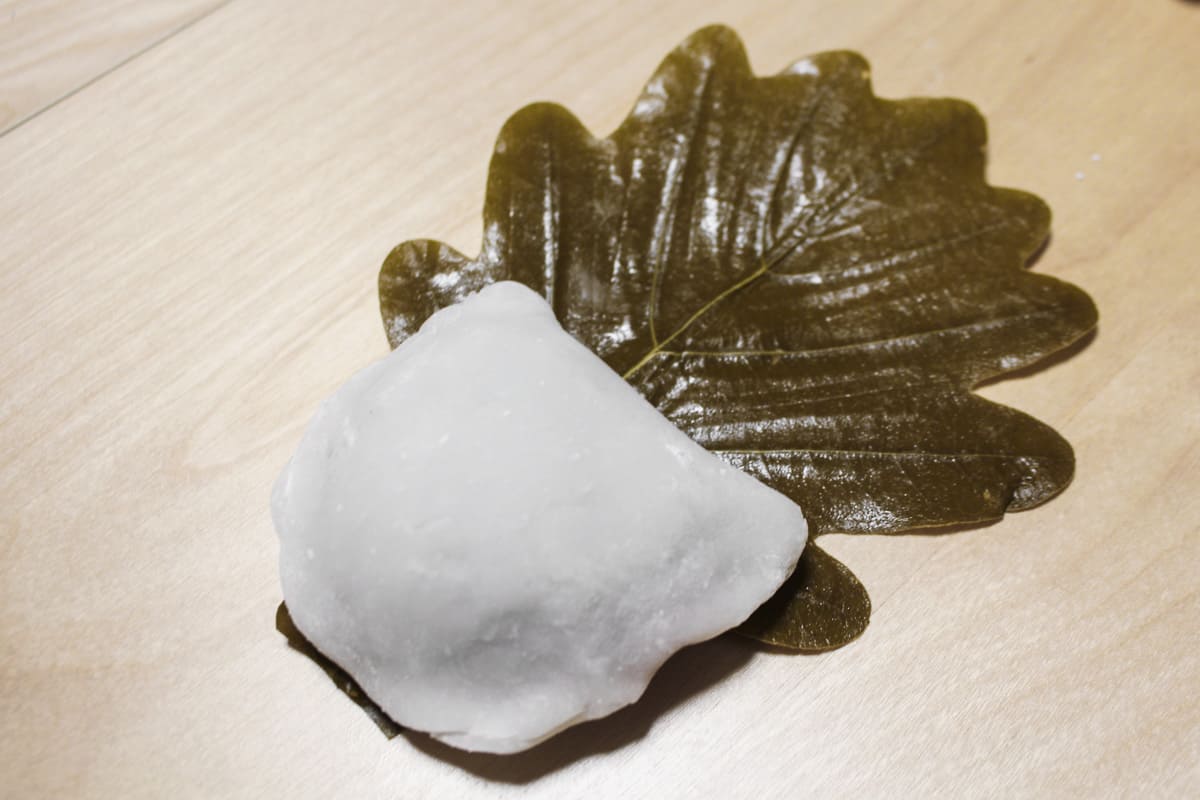
Step 7: Assemble. Dust your surface and hands with potato starch or cornstarch and flatten a piece of mochi into an oval. Put a ball of red bean paste in the center, and wrap it with the mochi. Make sure the sides are completely sealed. Place the mochi on the shiny side of the kashiwa leaf and fold the leaf over.
Step 8: Steam Again. The kashiwa mochi looks done at this point, but we need to steam them one last time. Put them back in the steamer for an additional 5 minutes. Depending on the size of your steamer, you may need to work in batches.

Optional Variations
There are so many ways you can get creative with kashiwa mochi! Here are some fun optional variations you can try to put your own spin on this traditional Japanese sweet:
- Matcha Kashiwa Mochi: Add some matcha powder to the dough to give it a beautiful green color and a subtle earthy flavor. You can also mix some matcha powder into the red bean filling for an extra dose of green tea goodness.
- Chocolate Mochi: Mix some cocoa powder into the dough for a chocolatey twist on the traditional recipe. You can also omit the anko and fill your mochi with chocolate ganache or Nutella for a decadent treat worthy of your favorite chocoholics.
- Try sprinkling on some kinako (roasted soybean flour) for a fun twist. You can also roll the mochi in chopped nuts, chocolate or colored sprinkles, or chocolate chips for added crunch.
Serving Suggestions
These kashiwa mochi are perfect for celebrating spring festivals like Kodomo no hi in Japan. They’re also a perfect accompaniment for your afternoon cuppa tea alongside cookies, tea cakes, and finger sandwiches.
Since they’re so light and refreshing, I also love packing them in packed lunches and picnics — the oak leaves help to keep them fresh and protected. Depending on the season, they also make for a lovely post-dinner treat. Serve a platter of these red bean mochi after katsu curry or cream stew for a traditional Japanese feast.
Recipe Success Tips
- Line the steamer with parchment paper and put cheesecloth under the lid of your steamer to prevent water from dripping onto the mochi and leaving them soggy.
- The kashiwa mochi are too soft to eat while they're warm, so let them cool completely before eating.
- Invest in a kitchen scale. It's important to measure your ingredients precisely, especially the rice flour and mochi flour, to ensure that the dough has the right consistency.
- When mixing the dough, use hot water to help the flour absorb the liquid more evenly and create a smooth, elastic dough.
- Be gentle and avoid overworking the dough. Much like baked goods, overworking the dough can cause it to become tough and chewy, which is not the desired texture we’re looking for.
- Use fresh and high-quality ingredients, especially for the anko filling. It can make a huge difference in the taste and texture of your kashiwa mochi!
- Keep the mochi dough covered with a damp cloth or plastic wrap while shaping pieces of it to prevent it from drying out and becoming too stiff to work with.
- Use a non-stick surface (e.g. parchment) when shaping mochi dough to prevent the dough from sticking to the surface and tearing.
- Properly store the finished kashiwa mochi in an airtight container in the refrigerator for up to 1-2 days. When ready to serve, let the mochi come to room temperature for a few minutes before eating.
FAQs
Imagine biting into a cloud of soft, chewy mochi dough that gently yields to reveal a filling of smooth, earthy-sweet red bean paste. As you savor the delicate sweetness, a subtle hint of the oak leaf wrapped around the mochi dances on your tongue, evoking a feeling of being in a magical, enchanted forest. In other words, kashiwa mochi are like a fairytale in your mouth with an unexpected, delightful surprise at every bite.
No, the oak leaf is not meant to be eaten. It's more of a decorative and protective wrap around the mochi. The leaf has a pretty tough texture and doesn't have much flavor.
Thanks for reading all about how to make delicious kashiwa mochi at home! I hope this post has inspired you to try your hand at making this Japanese sweet treat. Remember, practice makes perfect, so don't be afraid to experiment with different fillings and flavors. And, most importantly, have fun and enjoy the process!
More Japanese & Japanese-Inspired Dessert Recipes

Make sure to follow me on Pinterest, Instagram, and Facebook where I share all of my gluten-free, dairy-free, and Japanese-inspired recipes. You can also sign up for my email newsletter to get all of my newest content delivered straight to your inbox!
Homemade Kashiwa Mochi (Gluten-Free!)
Ingredients
- 2 cups joshinko rice flour (上新粉)
- ⅓ cup mochiko flour (もち粉)
- ¼ cup granulated sugar
- 1½ cups water
- 1½ lbs sweet red bean paste
- potato starch or corn starch
- 19 kashiwa leaves, dried or vacuum packed
Instructions
- Prepare the kashiwa leaves. If using dried leaves, rehydrate them in water. If using vacuum packed leaves, rinse them with water and pat dry with a paper towel. Set it aside to use later.
- In a bowl, mix the joshinko rice flour, mochi flour, and sugar. Slowly pour the water and stir until it forms a paste.
- Line a steamer with parchment paper or cheesecloth, and put the paste inside. Steam for 20 minutes.
- While waiting for the mochi, divide and roll the red bean paste into 8 equal balls.
- Take the mochi out of the steamer and knead until it forms a ball. Divide into 8 equal pieces.
- Take one piece of mochi and flatten it out into an oval. Place a red bean paste ball in the center and wrap it with the mochi. Make sure the sides are completely sealed.
- Place each mochi on the shiny side of the kashiwa leaf and fold the leaf over the mochi. Put them back in the steamer for an additional 5 minutes. Let them cool completely before eating.


Life Diet Health says
Hello Ai 🙂 Thanks for bringing these to Fiesta Friday this week, they look like a delicious sweet (my boys would love them)! A question about the flours - do you think regular rice flour would work or does it specifically need to be these types?
Ai says
Hi! I haven't tried with regular rice flour... the joshinko rice flour is made from finely milling Japanese short grain rice, and it's gluten free. Mochi flour is made from mochi rice. I would suggest using these specific types for best results, but if you do try it using regular rice flour, let me know how they turn out!
Life Diet Health says
🙂 thank you Ai... I will do!
Jhuls | The Not So Creative Cook says
I've always wanted to make my own mochi, but time is not permitting me to. One day, I will... Thanks for the inspiration and this sounds so good. We have something similar in the Philippines - maybe I can share them one day. 🙂 Happy FF!
Ai says
Hi Jhuls! I would love to see your recipe! Happy Fiesta Friday 🙂